SilhouetteConnect Setup Screen
When SilhouetteConnect is first run a SilhouetteConnect Setup screen will be shown unless the application was automatically configured with a CustomProperties.xml file during installation.
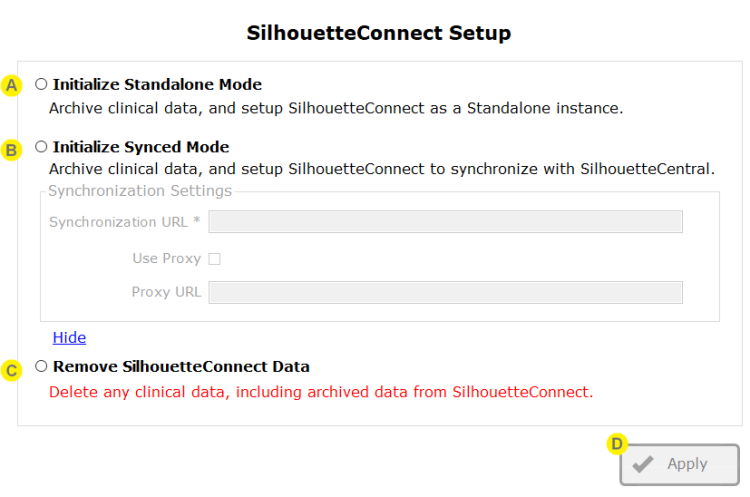
The SilhouetteConnect Setup screen allows you to initialize the SilhouetteConnect operation mode, choosing between Standalone or Synced mode.
To force the SilhouetteConnect Setup screen to show you run the SilhouetteConnect.exe with the --setup command line parameter, e.g. run the following command from the Run dialog or the command line:
C:\Program Files (x86)\ARANZ Medical Limited\SilhouetteConnect\SilhouetteConnect.exe --setup

|
Choose Initialize Standalone Mode to start SilhouetteConnect in Standalone mode. This creates an empty SilhouetteConnect Standalone database with default settings. If there is already data in the SilhouetteConnect program data folders it is moved to a data archive folder before initializing the new system. See the help topic SilhouetteConnect File Storage and Backup for further information. When initializing as Standalone mode it is expected that the named SQL Server Express instance is already configured. If the SilhouetteConnect Synchronized mode installer package was used to do the initial installation, the SQL Server Express instance will not be there and the initialization will fail. Run the setup.exe from the Standalone installer package to setup the SQL Server Express instance as required. |
||

|
Choose Initialize Synced Mode and set the Synchronization Settings to start SilhouetteConnect in Synchronized mode. Set the Synchronization URL to the URL of the SilhouetteCentral instance to sync to, typically something like:
The serviceview.asmx part of the path will be appended to the URL if it is not entered. The application will try the URL once you press the Apply button and determine if SilhouetteCentral is responding. If there is any data already saved in either the current users Synchronized mode data folder or the mode data folder, that data is moved to a data archive folder before re-initializing the application, see the help topic SilhouetteConnect File Storage and Backup for further information. Other PC users will have their data archived the next time they start SilhouetteConnect, if the Sync URL has changed since they last used the application. |
||

|
Choose Remove SilhouetteConnect Data to remove all the current users synced data and any PC wide standalone data and data archives. This option also removes organizational settings and resets any Synchronization Settings. It does not remove the log files, machine specific settings or preferences or SilhouetteStar 2 software patches.
|
||

|
Select the Apply button to execute the selected initialization / re-initialization option. To exit the setup screen without making any changes to the configuration or the existing data then close the application using the close window button at the top right of the application window. |
