Single Sign On with an External Authentication Provider
Configuration of SSO feature needs to be coordinated with the configuration of the authentication/identity provider.
The high-level tasks to configure the external authentication provider are:
- Add the SSO Integration optional feature to the SilhouetteTokenService license.
- Configure the SilhouetteTokenService with the authentication provider details, see SilhouetteTokenService Web Application Configuration.
- Provide the SilhouetteTokenService connection information to the authentication provider, including:
- Entity ID.
- Assertion consumer service endpoints.
- Claim mapping requirements.
- Configure the Silhouette Group to authentication provider claim mapping in SilhouetteCentral administration screens, see the Administration User's Guide.
- Test SSO integration, see Verify Single Sign On with an External Authentication Provider.
- Optionally disable Silhouette Local User login, see SilhouetteTokenService Web Application Configuration.
Example: Configuring Silhouette SSO Integration with AD FS
The configuration of Active Directory Federation Services (AD FS) is outside the scope of this documentation and it is recommended that you follow the AD FS configuration manuals. The example offered in these manuals are to provide some context and clarity to assist with the Silhouette configuration.
This example assumes you have the following items in place and are simply adding Silhouette as a Relying Party (RP) into AD FS:
- An AD FS server is in place with an Attribute Store and Claims Provider Trust configured.
- The AD FS Entity ID is
http://adfs.anonhealth.aranz.nz/adfs/services/trust. - The AD FS Metadata URL is
https://adfs.anonhealth.aranz.nz/FederationMetadata/2007-06/FederationMetadata.xml. - Active Directory (AD) has groups 'SILHOUETTE Vendor Support' , 'SILHOUETTE Admin', 'SILHOUETTE Clinical'.
- AD has users configured with membership in each of the above AD groups.
- The SilhouetteTokenService website is available at
https://anonhealth.aranz.nz/silhouettetoken. - The SilhouetteTokenService is already licensed with the optional feature SSO Integration.
- SilhouetteCentral has groups 'ARANZ Medical Support', 'Admin', 'Default' configured.
Configure the SilhouetteTokenService
Edit the SilhouetteTokenService appSettings.production.json file to include the following Saml2 configuration.
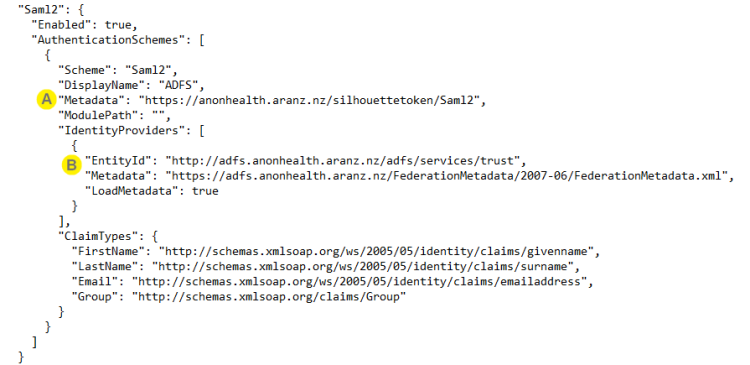

|
The URL where the SilhouetteTokenService Saml2 metadata is available. |

|
Entity ID and Metadata URL of the AD FS server. |
Stop and start the SilhouetteTokenService to apply the configuration.
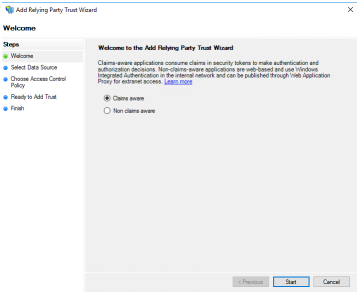
Add Silhouette as a Relying Party Trust to the AD FS Server
Using the AD FS Management interface, select the Add Replying Party Trust action.
|
SilhouetteTokenService is a Claims aware RP. Select Claims aware and press the Start button. | ||
|
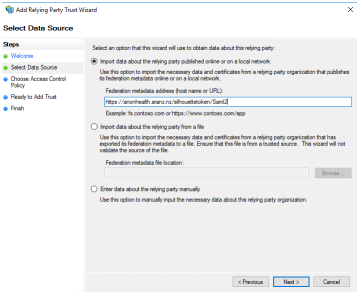
If the SilhouetteTokenService metadata URL is published at a location where the AD FS system can access it then enter the metadata URL in the 'Import data about the relying party published online or on a local network' text box. Alternatively, the metadata can be imported from a file by navigating to the SilhouetteTokenService metadata URL in a web browser to retrieve the file, which can then be provided to the AD FS system. Once copied the file location can be entered in the 'Import data about the replying party from a file' text box.
|
||
|
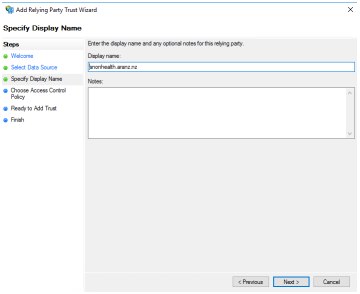
Choose a display name for the RP and press the Next button. | ||
|
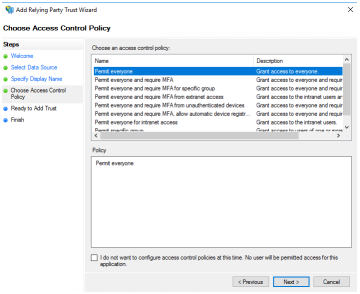
Select the appropriate access control policy and select the Next button. | ||
|
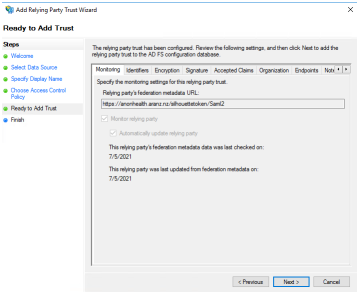
The next step in the wizard shows the RP configuration for review. SilhouetteTokenService EntityId is shown on the Identifiers tab and the SAML Assertion Consumer Endpoints are listed in the Endpoints tab. Select the Next button. |
||
|
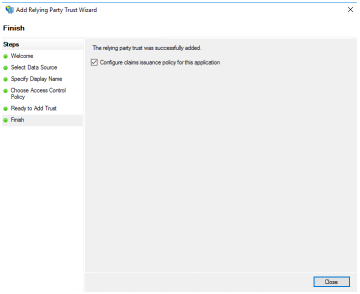
If the RP configuration was successful then you can either move on to configure claims issuance policy or close the wizard. | ||
|
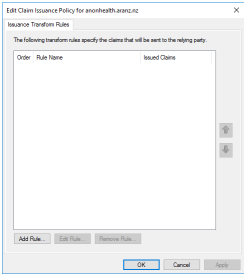
The next step is to setup claim issuance policy to issue claims about the identity to Silhouette. Most of the data about the identity comes as a claim. An claim issuance policy for an RP can have multiple rules of different types and can have filters applied to the information shared (e.g. only issue group claims that start with Silhouette). This example a simple example of sending LDAP Attributes as Claims. To edit the claim issuance policy for an RP, select the RP and choose the Edit Claim Issuance Policy action. |
|||
|
Select the Add Rule... Button. | ||
|
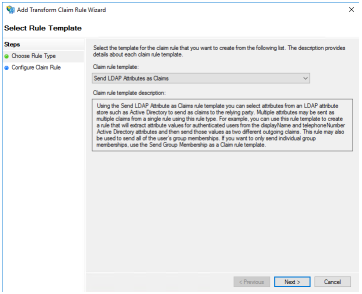
Select the Rule Type. This example shows sending LDAP attributes as Claims. Select the Next button. |
||
|
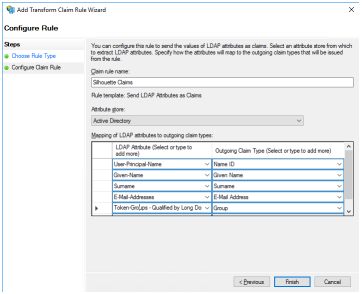
Give the claim rule a name. Select the Attribute Store which has been previously configured. Map LDAP attributes to outgoing claims.
Once completed, select Finish and then Apply. |
||

|
The screenshot shows the LDAP attribute Token Groups - Qualified by Long Domain Names being used as the group identifier. There are a number of options giving slight different information. As by way of an example, the membership to an group 'SILHOUETTE Admin' in the domain med.anonhealth.aranz.nz:
You can also send a custom claim string for a precise group membership using a different type of claim issuance rule. If users have a lot of group memberships and are using long domain name or Is-Member-Of-DL mapping, then the login may fail with HTTP Bad Request - request headers too long errors. In this case it is also possible to apply filters to the group memberships that are sent, only sending those relevant to Silhouette. |
Configure the Silhouette Group to Authentication Provider Claim Mapping
When all the above AD FS configuration done successfully, there is a Login with ADFS button on the Silhouette login page. Using that button shows the ADFS login page and users can login with their anonhealth.aranz.nz ID. However, when they do login all they see is a webpage that reports Access Denied until they are part of a AD group that is sent to a claim in AD FS, which is in turn then mapped to a Silhouette Group.
To map an authentication provider claim to a Silhouette Group:
- Login to SilhouetteCentral as a Local Silhouette User with Can Manage Users and Groups permission (e.g. the default admin account).
- Navigate to Admin > Groups and select the Group you wish to apply mapping to.
- Select Edit, add the Authentication Provider Claim mapping for the appropriate Authentication Provider by inserting the exact string you expect to receive in the group claim value and Save.
- Repeat for each Silhouette Group, mapping the appropriate claim to the group.
- Once complete, you can logout and then attempt to login through the Login with ADFS button on the login page and you will be granted access to the system according to your group membership.
- Use the procedure in Verify Single Sign On with an External Authentication Provider to check the mappings and access.
|
|
A user account in Silhouette can only be mapped to a single Silhouette Group. However, a user in AD may be a member of lots of groups. When a users initially logs in to Silhouette they are assigned to any group with a valid mapping for their group claims and their other group claims will be ignored. The order of the groups is non-deterministic. After their initial login, they will not change group membership unless they are actively removed from the mapped group in AD. |
|
|
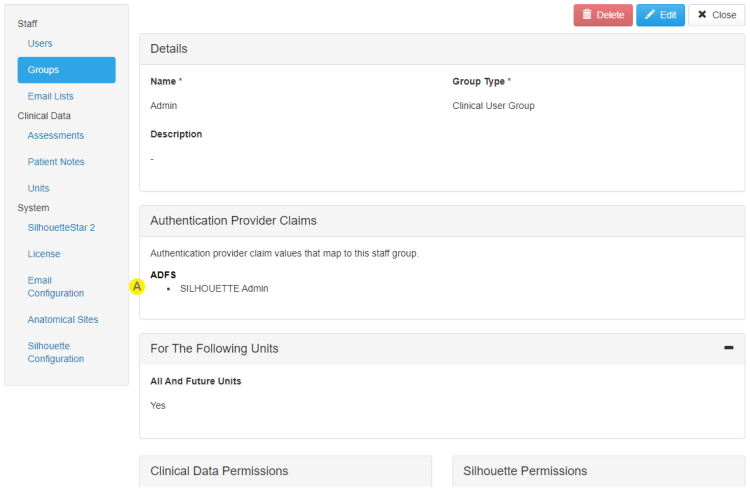
An example of the claim SILHOUETTE Admin from the ADFS Authentication Provider mapped to the Silhouette Group called Admin. |
Disable Silhouette Local User Login
Once SSO integration is complete and you have all user accounts (include ARANZ Medical support and system admin) accounts managed in the external directory, you can disable Silhouette Local User login, see SilhouetteTokenService Web Application Configuration.
Once Silhouette Local User login is disabled, the Silhouette login page is skipped and users will only see the external login provider page.
Use the test listed in Verify Single Sign On with an External Authentication Provider to verify Silhouette Local User login is disabled.
If the external authentication provider becomes unavailable or the integration fails at some point, then a privileged user can enable the Silhouette Local User login again to provide emergency access to the system.